Everything You Need to Know About 3-D Pumpkin Carving.
DISCLAIMER: The people who do those incredible carvings you’ve probably seen featured in a thousand re-posted Buzzfeed filler-articles use better tools than I do and are just way better at this than I am. But this article isn’t for those highfalutin fancy boys; this article is for any average Joe or Jane who doesn’t mind totally trashing their mom’s melon baller for the sake of making art that rots on their front porch. In short: I am not a professional. Please try this at home.
It’s my favorite time of the year. The summer heat is dwindling, I can once again hide my fat rolls under layers of flannel, and the plastic skeletons I leave in my yard year-round are finally OK with my neighbors. I love everything about autumn and Halloween, and there’s a special place in my heart for digging around in those soggy cardboard boxes in the Sack ‘n Save parking lot for the perfect pumpkin. But one thing I’ve never liked is dealing with all the sloppy guts you have to dig out of your gourd before you can get to the fun part. Eviscerating pumpkins is a chore, and chores are lame. So the moment I saw the amazing works of folks like Ray Villafane and The Pumpkin Gutter, I ditched my gut scoop and never looked back.
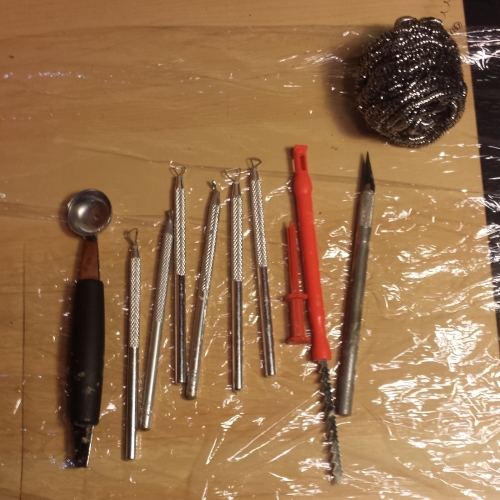
Tools You’ll Need.
• X-Acto knife.
• Those metal loop things used for sculpting clay.
• Toothpick or any other poking instrument.
• Plastic wrap.
• Steel wool.
• Your mom’s melon baller.
• Pumpkin.
Choose a Pumpkin.
• The size/shape of your pumpkin should be whatever best fits your design or idea. Try to visualize your carving while you shop. Does your pumpkin face need a big nose? Then try to find a pumpkin that juts-out where the nose would be.
• Make sure the pumpkin can stand upright on its own and stay that way even when jostled.
• Heavy is good. That means the rind is thicker, which is ideal for carving. Decide on the size of pumpkin you need, then pick the heaviest one of that size.
• Ugly pumpkins need love too. Don’t mistake dirt for rot.
• If possible, try to snag your pumpkin as soon as a new shipment arrives. The fresher it is, the moister the rind will be. Moist rinds will give you a longer window of working time and make for smoother carving. #moistrinds
• Stems aren’t necessary, but they look cool and I like them.
• Walmart pumpkins are garbage pumpkins for garbage children.
Setup.
• Wrap your carving table in plastic wrap and tape it down so it stays in place. Dexter had the right idea. You’ll thank me when it’s cleanup time.
• If you have access to a floor lamp or similar lighting, grab that too, you’ll definitely want to use it. If not, no big deal.
• Keep some paper towels nearby. You’ll need to clean your tools and wipe the pumpkin juice off your hands while you work.
• Crack open a beer and get stoked.
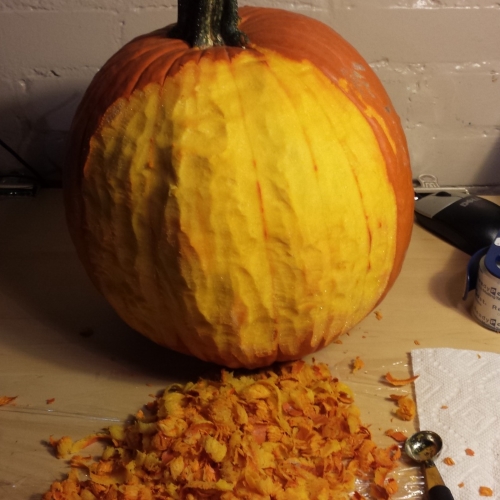
Remove the Skin.
Use the melon baller to repeatedly scrape the surface of the pumpkin downward until you’ve cleared the area you want to carve. It takes some work to get the edge of the melon baller to catch on the skin, so don’t get discouraged and don’t hesitate to get rough with it.
Sketch the Rough Features.
Using the melon baller, “sketch out” the rough features of the face. This will give you a basic idea of where everything goes while you’re carving, and it’ll help you get a feel for how much depth you’ve got to work with.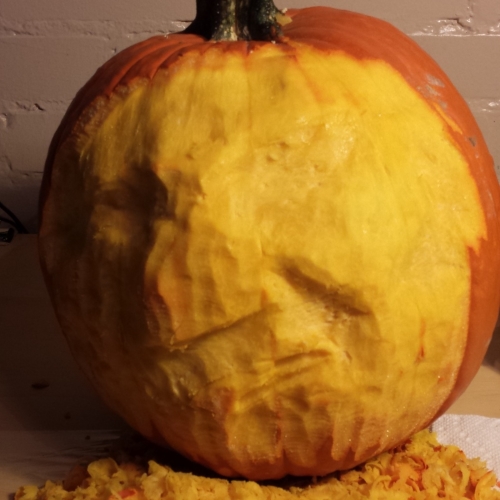
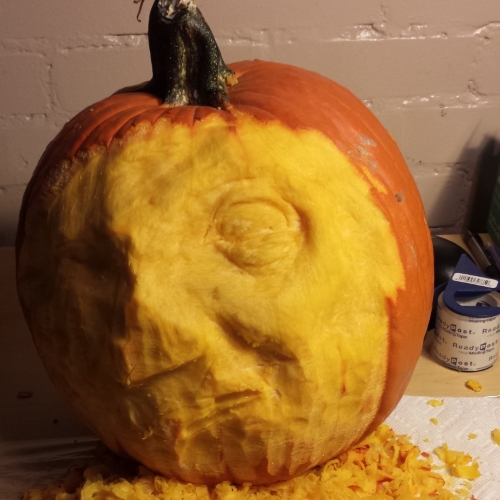
Carving.
You’re going to mess this up. It’s OK. Embrace it. This isn’t easy, and it takes a lot of practice. In fact, I messed up the first pumpkin I tried to carve for this article. I also totally messed-up the eye on the pumpkin I ended up using for these photos. It happens. When you inevitably mess up a pumpkin, just toss it into your neighbor’s yard and start again. The actual process of carving is difficult to explain. Like any art form, the only real way to learn is by hands-on trial and error. I can’t give you a step-by-step process, but I can give you this handy list of tips:
• Use reference material. Find a picture of a face and keep it handy. We look at humans all day, every day, and you might be saying to yourself, “Whatever, dweeb. I know what a face looks like!” but I speak from experience when I say that nostrils are weird and nothing about human anatomy makes sense.
• Use the tip of the nose as a reference point. That’s the part of the carving that will stick out the farthest, and it’s the easiest way to gauge proportion for the rest of the features.
• Use the X-Acto knife to make wrinkles and define features. I recommend making V-shaped cuts: cut at a 45-degree angle, then make the same cut from the opposite angle like you’re carving a V shape. You can use it to make hard lines that really make the features stand out.
• Constantly be aware of how much rind you have to work with. You need to be careful not to cut too deep or you’ll end up ruining all your hard work. You can tell when you’re getting close to the inside wall by the color and texture of the rind. The deeper you get, the whiter and flakier it becomes. (If your pumpkin is flaky all the way through, your pumpkin is too old and dry.)
• Embrace the fuckups. Just keep repeating, “I meant to do that.” Did you just screw up? Na, you cut that pumpkin’s eye all the way off because, um, it’s a zombie and it got shot in the face. Badass, right?
• Don’t work too quickly. Even though you have a limited window of time before the pumpkin starts drying out, don’t rush your carving. It’s far too easy to get cavalier about it and end up wrecking your detail. Depending on how fresh your pumpkin is, you’ve got about 2-3 hours of working time.
• Use the steel wool to “polish” the pumpkin. This will smooth it out and help detach stray rind flakes. It also works as a kind of “eraser.” If you cut a wrinkle into the pumpkin’s face that looks really bad, you can smooth it out with the steel wool and try again.
• Keep on embracing those fuckups. That extra deep gash on one side? You definitely meant to do that. No one walks away from a prison knife fight without a few scars, dude. No one.
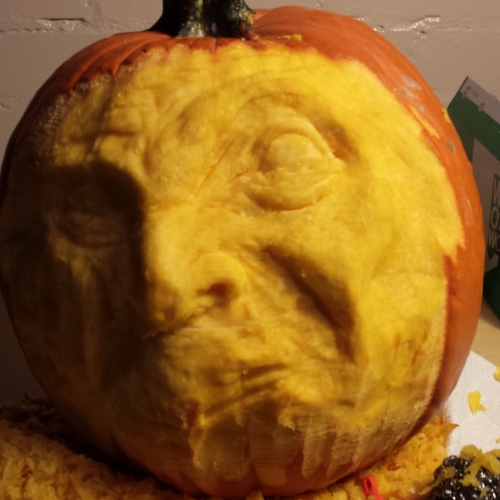
Showing it Off.
You’re carving this for a photograph, not for display. This is the most important thing to remember about this carving method, and it factors into the process in multiple ways, so let’s talk about how to best photograph your work:
• Your carving is probably going to look bad in profile. Since you’ve only got so much rind to work with, it’s really difficult to capture realistic proportions of a human head. Focus on making the face look good from the front, not from the side.
• Your carving is never going to look better than it does the moment you finish carving it. Much like a real human head, your carving quickly begins drying out, sagging, and wondering where the years have gone as it stares longingly into the mirror. Within an hour, your carving will already have become noticeably gaunt and less distinct in detail.
• Your carving will look terrible when you change lighting. When you rush the pumpkin to the porch so you can impress your cute neighbor with your creepy vegetable art, you’ll be horrified to discover that the sun is not nearly as flattering as that stupid salt crystal lamp in your living room.
• Just take a picture already. As soon as you’re done carving, snap some photos and be proud of what you’ve done. These things really aren’t meant for display, and they’re prime targets for teens who hope that smashing other people’s stuff will impress Randy, the older kid who buys them vape cartridges at 7-Eleven. Besides, aren’t Instagram double-taps the only reason you’re doing this in the first place? Be honest. We’re all friends here.
• Let it go. Preserving your pumpkin isn’t really worth it. There are lots of tips out there for how to extend the life of your pumpkin, like spraying it with bleach, putting it in the fridge, or giving witchcraft a go. I’ve tried them all, and none of them really work all that well. Besides, even if you manage to prolong the aging process, your pumpkin is still going to look stupid in the sun and get smashed by Randy’s cult of pre-teen vapists. Just let it go, dude. Let it go.
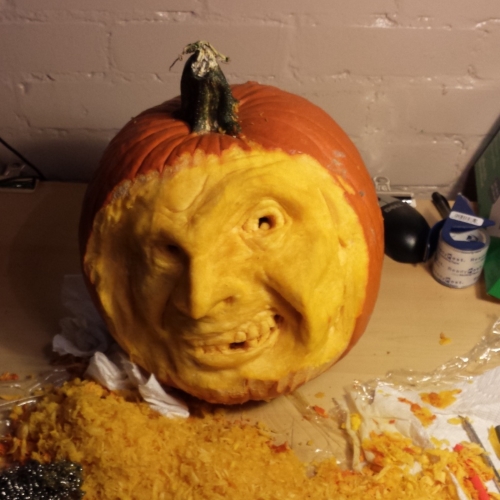
See? Look how bad I messed up that eye! Let it go. And just like your selfies, you can always pick a good Instagram filter to hide your depressing flaws!
Cleaning Up.
Wash your tools as soon as possible.The longer you wait, the harder they’ll be to clean. Pumpkin rind dries the way egg yolk does. It sucks. Also, just throw away the steel wool. It’s really only good for one carving. Finally, I hope I don’t have to tell you how to clean off a table. I’m not your mother.
Once everything is good and clean, I highly recommend checking out The Pumpkin Gutter’s website. He has a lot of good resources and, unlike some other pumpkinsmiths, he doesn’t charge fifty bucks for a DVD tutorial.
Happy carving and happy Halloween!

